Magatamas are the new material from Shimosa. They drop in many of the Shimosa free quests. If you need different materials, you might choose to farm the mixed nodes. Arakawa Plains is the new best location for Gallstones.
Shimosa Castle Town: Magatama-only node is very easy to farm with archers. The black samurai are [Sky, Demonic, Humanoid, Undead]. Samurai are demonic like Crabs so Tawara, Raikou, etc. hit trait. You can bring your AoE seashell farming team here. Run something simple like Bunyan -> Child Gil -> Ishtar.
Shimosa Battlefield: The shadow servant here is Raikou but as a Rider. Bring two charisma servants (e.g. Child Gil for W1, Rama for W2) and an anti-Sky/Earth (Raikou or Tesla), anti-Divine (Karna), anti-Riding+Divine (Nobunaga), anti-servant (Gilgamesh), etc. for W3. Use Bunyan for W1 and/or RaikouLancer for W2 for higher output. Alternatively, Arash W1 and cycle in Merlin.
[FGO] CQ 3T Racing - Artoria MAlter Lartoria vs Brave Girls Encore (2019-10-02)
Here we demonstrate a challenge quest 3-turn with the Artoria gang: Artoria Pendragon OG Saber, Maid Alter (MAlter), and Lancer (LArtoria) versus the 2019 CQ for the FGO Halloween 2018 Rerun event. The setup shows a simple example of NPing looping with MAlter. Unfortunately I started experimenting with this setup at 8:40PM PDT, 20 minutes before the event closing time, so I couldn't get a run with great RNG to show off.
Halloween 2018 Rerun - full 100% spawn bonus min-turn phoenix feather farming at Graveyard
0:00 1x MLB-Kscope Double NP with Mordred | 2:53 1x reg-Kscope Example
If you have more MLB-Kscopes, you can start replacing the servants here with other farmers such as superscoped Nitocris, Ibaraki, Bunyan, Siegfried (anti-Dragon against LAlter), Shuten, other AoE assassins, berserkers, etc. Here we demonstrate min-turn, 100% additional spawn Phoenix Feather farming at Graveyard Demon Lord Difficulty in the FGO Halloween 2018 Rerun Event. The phoenix feather droprate here with this spawn bonus is better than Agartha free quest droprate.
This video demonstrates: Arash, Nitocris, Bedivere, Mordred, Helena, Kiara
I have made an overview translation of an update notice posted on Appmedia on 2019-08-20, which listed proposed changes to the JP tier list as a result of shifts in the JP meta. I have inserted my own notes based on my knowledge of and experience with JP gameplay throughout the summary to provide better context.
JP FGO is experiencing a meta shift. There will be significant changes to the rankings on JP tierlists in the coming weeks. Let's focus on the changes that will be made to the Appmedia one:
A number of hybrid support attackers are currently ranked too low. This is because they are decent attackers, but extremely strong supports. Current ratings reflect this balance, but do not do justice to how overpowered as supports. Their ranks will be boosted soon. Two servants stand out:
Summer BB: the cardlock enables absolutely insane boss min-turn fight runs otherwise impossible
Nero Bride: the new strengthening has boosted artspa (arts parties) to the forefront for 3T farming. As noted by players, she was *already* used to boost quick teams refunding BEFORE her buff in some niche situations
Debuff cleansing is currently overrated as of the recent meta. Debuffs from boss fights and CQs have generally been unremovable as part of the fight mechanic. The CQ-rating of servants with debuff cleanse skills may therefore be lowered soon.
Due to the strengthening of Tamamo earlier this year and Nerobride this summer, Artspa is now in meta alongside Skadi system.
Many servants will be boosted up due to current low-HP-enemy + refunding meta. Many servants can now 3T or min-turn boss fights and farming nodes due to strengthened Artspa (Nerobride+Tamamo), Skadi, and Summer BB (cardlocking arts cards for refunding or buster cards for buster crit chains) and refunding 100% after immediately breaking break bars on every turn. The low HP of enemies in both boss fights and farming situations allow many more servants, who have lower NP output, to shoot to the forefront since all that matters is whether they can refund with the appropriate setup. 3T arts loopers will also have their rankings increased in general.
It is POSSIBLE that future events and boss fights involve enemies with a MUCH higher HP and the rankings will need to change again.
Most notable examples of servants where they plan to move up to SS status when the new rankings are finalized
Jeanne Archer: change from S (Godjuna level) to SS (Dantes level) for farming
Swimsuit BB: change from B+ as an hybrid attacker to SS (Merlin level) as a support for CQs and is honestly much more gamebreaking than Merlin in current min-turn refunding meta for CQs.
Nerobride: boss fight ranking changed from A (Scath, Kama, Melt, Archuria, etc. level) as an attacker to S (Waver level) as a support due to enabling min-turn refunds. Farming ranking changed from S to SS (Skadi level) for enabling many more 3T artspa loop farming teams (more arts attackers & CE choices outside of kaleidoscope)
Furthermore, there are currently potential plans to put the all units of all rarities together in the same list due to the brokenness of units such as Chen Gong (who would probably be SS level when compared to SSRs even despite the lower stats).
There are 5 timegated segments to this event: First Gate, Second Gate, Third Gate, Summit, and Epilogue. Each of first four portions will have a different raid and will last roughly two days. New nodes may also open up. Epilogue should last from 13th to 20th. Rakshasa-difficulty nodes will open when the Epilogue portion (Week 2) of the event arrives. The main materials to farm from free quests will Feathers & Hearts in the Tower during the second week. The graphic to the left is a quick reference for currency farming depending on what timegated segment we are on.
Oni Difficulty Currency Farming 3-Turns with Nitocris and Double NP Refund Kiara
In case anyone wants to go out of their way to play around with Kiara and double NPs, you can try this. She refunds 29% after W2 in both nodes for me. (5x gacha CEs + 1x Sumo). W1: Nito NP | W2: Waver's buffs on Kiara. Activate Kiara's third skill. Kiara NP; Kiara will refund 29%+ | W3: Kiara battery + mage association (29%+50%+20%=99%~=100%). Kiara NP.
I also tried calculating what it would take for her to triple NP... you have to bring down an enemy to really low HP (without killing them) before each NP for a full-fledged nerobride-tam-waver-plugsuit setup to work - really hard to do since Kiara's facecards will just instakill enemies. (Assassin enemies = poor refund)
Rakshasa Difficulty Currency Farming 3-Turns with Nitocris, Lancer Artoria, Shuten, and Siegfried
The Nito + Kiara setup should still work for Mountain Trail - Rakshasa (corals, gears) & Tower - Rakshasa (brocades, hearts, feathers) but you may need to backline hot springs depending on how much damage Kiara outputs; refund works if 3rd skill is lored
Here are a few 3-turn examples for farming while trying to maximize gacha CE slots with Lartoria, Shuten, Siegfried, Kiara. Farm Mountain Trail for corals and gears, Tower for brocades + hearts + feathers, Hot Springs for baskets + void dust + tearstones, and Summit for all three currencies + dragon scales.
This is one of the few events where the mixed currency "Summit - Rakshasa" node is actually quite efficient if your ONLY goal is to clear event currency shop. The threshold between efficiency appears to be at around +8 bonus drops. (e.g. If you have access to 4x MLB or fewer of each gacha CE, Summit is more efficient than running each of the other nodes separately if you still need *every* currency.) Note however that the material drops in this "Summit" node aren't particularly valuable - players usually have a lot of Dragon Scales already. Furthermore, we have a lot of free time for the rest of the event. You should have plenty of time to clear shop even running the other nodes separately. So Summit should be a last resort option if you need to rush farm the three currencies together! You should probably still aim to farm the currencies separately: remember that "Tower" is a good quest because of the hearts and feathers.
The table below demonstrates the value of mixed materials nodes (Tower-Rakshasa here). Obviously everyone has different immediate material needs, so there’s no universal need to degen on this node, but it’s something to consider for spending your natural AP on. There will be plenty of opportunities to farm in the future. But it’s cool nonetheless to identify significant efficiency where it exists.
For example, if you tried to farm 50 hearts from Shinjuku free quest (188 APD) and 100 feathers from Agartha free quest (70 APD), you would need 15,815 AP on average. If you instead use 15,815 AP on Onigashima's Tower-Rakshasa node, you would get 84 hearts AND 127 feathers instead. Indeed, you would earn 34 hearts and 27 feathers more on average with the same amount of AP spent! Combo node efficiency is a scary thing.
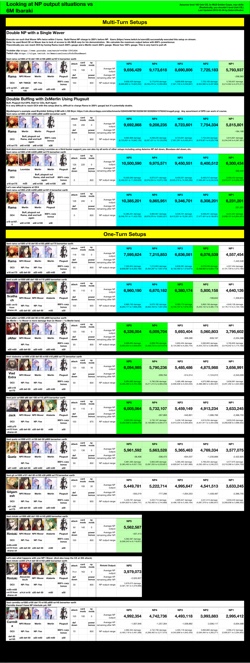
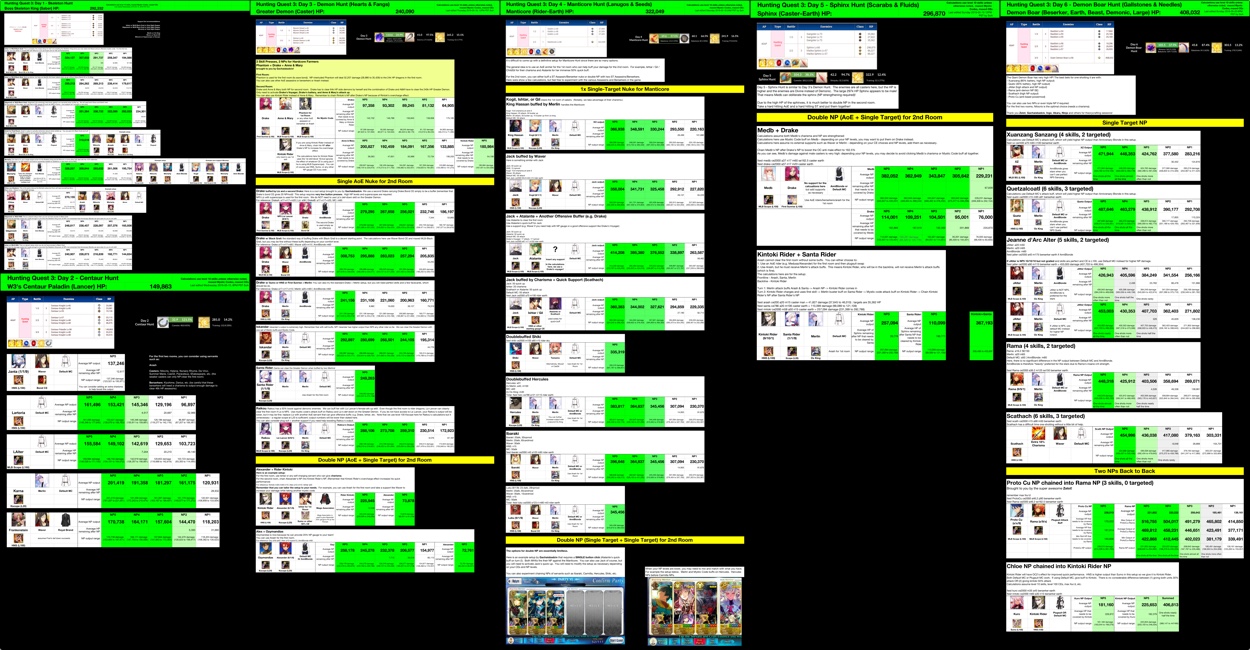
FGO NA Rashomon Rerun Ibaraki 3BP - 6 Million Bullying Max Setups
Ishtar w/ MLB Black Grail: This is probably the nicest setup for AoE one-shotting the Skeleton King since you only need one Waver and an offensive mystic code. For the first two rooms, you can either (1) double NP with Nitocris or (2) use Arash and an AoE archer/berserker.
For the first two rooms, you can consider using Arash or all sorts of AoE Casters or AoE Berserkers. For the third room, the optimal choice is Lartoria with Holy Night Supper - no support is required. You can also use JAnta, Karna, LAlter, or Frankenstein.
Day 3: Demon Hunt (Hearts & Fangs)
Day 4: Manticore Hunt (Lanugos & Seeds)
There are two general approaches to dealing with the second room. You can either (1) use an AoE NP + ST NP or (2) buff a single AoE NP.
Drake + Anne & Mary Double NP
Iskandar buffed by Merlin
Santa Rider buffed by 2x Merlins
Raikou buffed by Liz + 1x Merlin
Alexander + Rider Kintoki
Alexander + Ozymandias
It's difficult to come up with a definitive setup for Manticore Hunt since there are so many options. The general idea is to use an AoE archer for the 1st room who can help buff your damage for the 2nd room. For example, Ishtar / Gil / ChildGil for their charisma and Atalante for her immense 50% quick buff. For the 2nd room, you can either buff a ST Assassin/Berserker nuke or double NP with two ST Assassins/Berserkers.
King Hassan buffed by Merlin
Jack buffed by Waver
Jack buffed by Atalante and a second buffer
Jack buffed by Charisma + Quick Support (Scathach)
Shiki buffed by Waver and Tamamo
Atalante + 2x MHXA or Jack Double NP
Arash + Carmilla + Hercules Double NP supported by Merlin
Day 5: Sphinx Hunt (Scarabs & Fluids)
Day 6: Demon Boar Hunt (Gallstones & Needles)
Sphinx Hunt is similar to Day 3's Demon Hunt. The enemies are all casters here, but the HP is higher and the enemies are Divine instead of Demonic. The large 297k HP Sphinx appears to be male! That means Medb can obliterate the sphinx (NP strengthening required)! Due to the high HP of the sphinxes, it is much better to double NP in the second room. Take a hard hitting AoE and a hard hitting ST and put them together!
Medb + Drake, No Support Needed
Kintoki Rider + Santa Rider + Merlin
The Giant Demon Boar has very high HP! The best bets for one-shotting it are with the servants below. One of the coolest setups is double NPing with Rama + Proto Cu with no support required. For the first two rooms, Nitocris is the optimal choice (needs a charisma).
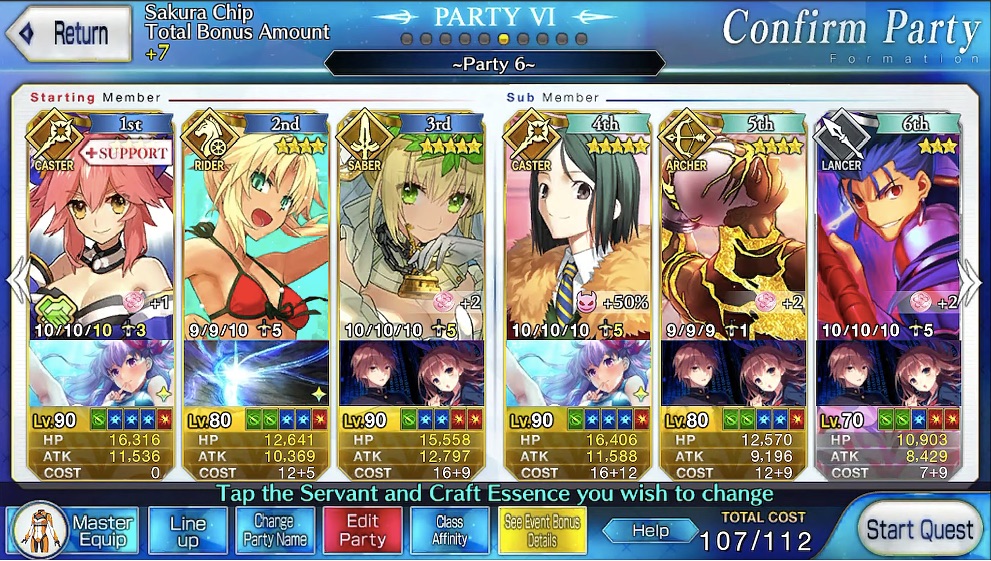
The first feather node that opens is the Weakness Ear node. We want to stack One Summer CEs to increase the Sakura enemies spawns by 100% (100% is the cap). Note that this CE is also known as "Someday in Summer" (JP translation). On top of the Sakura Chips, each Sakura Hand has a ~6% chance for dropping feathers and each Sakura Bot has a ~7% chance of dropping octuplets!
At 100% increase spawn rate, the first two rooms will have 6 enemies each while the last room will have 5 enemies for a total of 17 enemies. This means that the minimum turns required is 6-turns. We can use Summer Mordred Rider to surf and NP six times. Particular care must be paid attention to NP gauge and cooldown reduction via firing Tamamo's NP.
The video below by TouhouSniper98 demonstrates the Surfmo setup. It is a modification of Hong's video. There are some extremely important notes to pay attention to.
Mordred Rider can be NP1. In fact, it is preferable for her NP level to be low because of the following considerations:
Tamamo's NP must be fired on Turn 4 if you are not using Bond CEs. Tamamo's NP will charge your party's NP gauge as well as reduce your party's cooldowns. This leads to the following choices:
If your Surfmo is low-NP-level, Surfmo will leave an enemy with a little HP on wave 4. This means you can place Tamamo's NP after Surfmo's NP and you will receive the full benefit of Tamamo's NP increasing your party's NP gauge. (See Hong's video)
If your Surfmo is high-NP-level and carrying an offensive CE (e.g. Golden Sumo, Holy Night Supper), Surfmo's NP will wipe wave 4 cleanly and preclude any subsequent commands in the attack chain. You thus must place Tamamo's NP before Surfmo's NP in the attack chain. Tamamo's NP will only reduce your servant's skill cooldowns - which means your servants must be lored properly so that the batteries and skills come back on time.
If your Surfmo is high NP-level and carrying Dragon's Meridian (a.k.a. Ley Line) - a CE with no offensive modifiers - you can still place Tamamo's NP after Surfmo's NP since Surfmo will be unlikely to kill the entire wave on her own even at NP5 (she will have no buffs on Turn-4). (See TouhouSniper98's video)
You can also directly replace Nerobride in the above setups with Xuanzang Sanzang (See Tutturuu's video)
If you are Bond CEs, you can boost Arts performance to meet the thresholds required for refunding enough without using Tamamo's NP nor Plugsuit+Waver. MoonTheStar(KannaMoon) has developed such a setup. (See Xzero's execution of the MoonTheStar setup)
You can also replace Plugsuit+Nerobride in Hong/TouhouSniper98's setup with a NP gain CE on Surfmo (e.g. MLB Azure Magical Girl (Miyu CE)) and Atlas Academy Mystic Code for further cooldown reduction. (See Tutturuu's video and Ein's video)
TouhouSniper98's video specifically demonstrates the 3rd option above.
Alternatively, MoonTheStar-KannaMoon has developed a setup with bond CEs to boost Arts performance. In this 4th case, you do not need to use Tamamo's NP and do not even need Waver.
Step by step directions from KannaMoon:
This comp involves sharing/splitting ur buffs between turns so that every turn u get enough to charge
Requires Tamamo Bond CE, Bride Bond CE
I'm using Super MLB Miyu & NP4 Surfmo Skill 9 Arts (Not sure if others work)

Turn 1: Use Mordred's Own 30% Charge + 20% Mage Association + Use Nero Bride NP Gain
Turn 2: Just NP
Turn 3: Just NP
Turn 4: Use Nero Bride Attack Up + Tamamo Arts Up + Mordred Arts Up
Turn 5: Just NP (And hope Lubu doesn't one hit crit mordred to death)
Turn 6: Just NP
Avici is the final node of the GUDAGUDA Honnoji Rerun. This node drops the most points and gold currency for the event, and is where players will spend most of their time finishing the points ladder. The node has a single room and 11 enemies - only three enemies are on the field at the same time. Therefore, the minimum number of turns required to farm this quest is 4 turns.
Our min-turn (4-turn) setup here uses 3 starting gauge CEs and therefore fits 3 GUDAGUDA Poster Girl bonus points craft essences.
Turn 1 (kill Bloodaxe, Caesar, Mata Hari): Arash NPs. This will clear Caesar and Bloodaxe but leave a few HP left on Mata Hari. Facecards in the attack chain will eliminate Mata Hari. Waver with Poster Girl has especially potent facecards.
Turn 2 (kill Drake, Benkei, Gilles): Mordred NPs. You will often be able to clear all three enemies even when Mordred is only NP1!
Turn 3 (kill Nobu and two golden Nobu archers): Jeanne d'Arc Santa Lily (Janta) NPs. This is a very easy clear.
Turn 4 (kill Okita and one last golden Nobu archer): Chloe von Einzbern (Kuro) NPs. This is also a very easy clear since Kuro will easily oneshot Okita.
FGO USA Tour 2019 Memorial Quests 1-Turns & Saber Alter Challenge Quest
February 24, 2019
The FGO USA Tour is LIVE!! I hope everyone is having fun! Xzero was able to livestream portions of the event - check out the VODs on his Twitch channel if you missed the streams!
There was a cool contest at the event. The challenge involved dealing the most damage to Gawain in Memorial Quests in a single attack without using a support (friend) servant.
Happy New Year everyone!!! Thank you so very much to all you great people in the FGO community. I wish everyone a wonderfully healthy, successful, prosperous, peaceful, and AMAZINGLY LUCKY 2019!!!
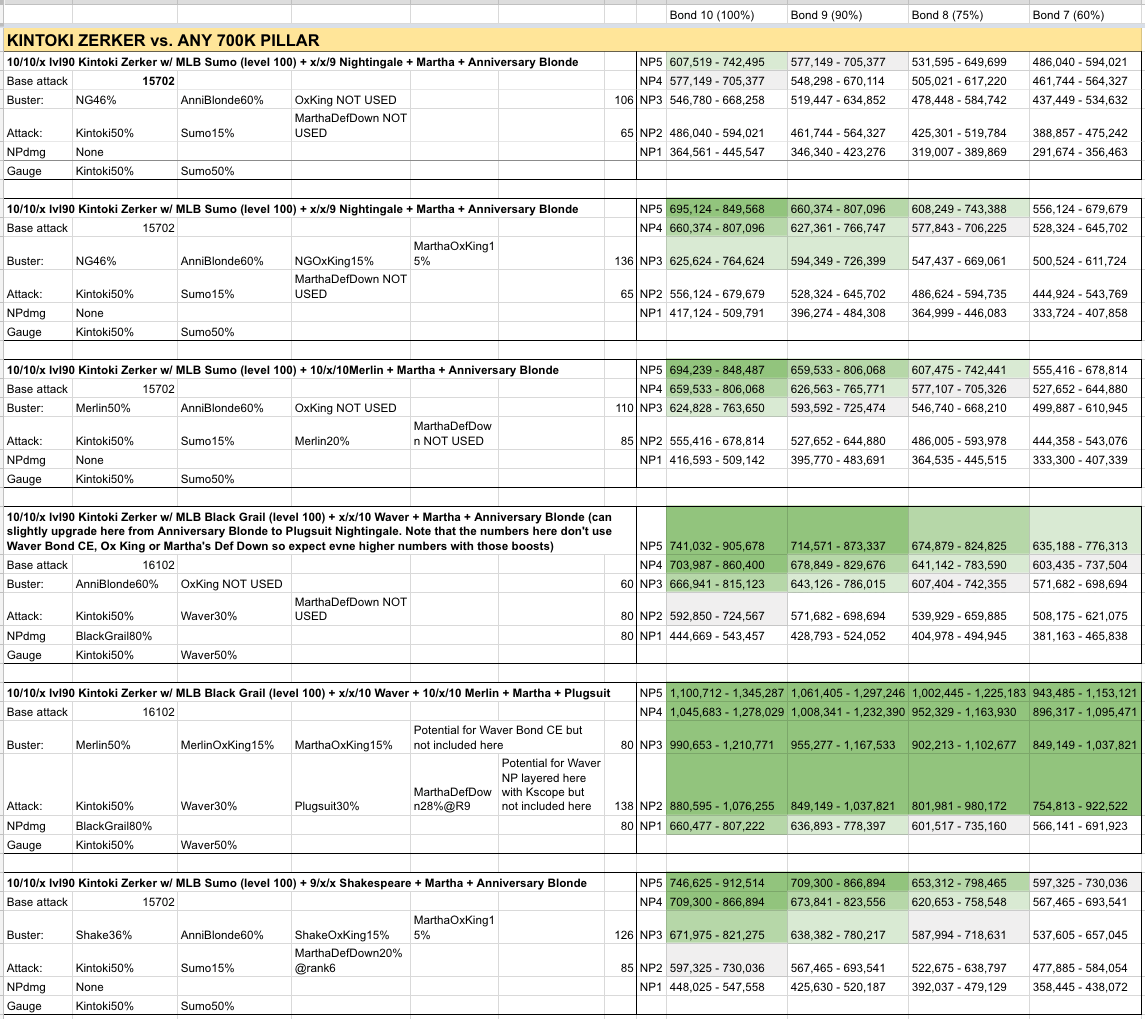
I hope everyone had a great time farming the Christmas Lotto and acquired a ton of materials and a bunch of MLB Holy Night Supper CEs! With Salomon Raids coming in a few days, let's start jotting down some random ideas about 1-Turning the raid pillars.
Item droprates aggregated from TW/JP: (Reddit) - note that, as you can see, the Saber pillar appears only after 4 pillars have been defeated. The other pillars appear immediately.
The default and simplest teampcomp seems fairly obvious: 10/10/x Bond 10 Kintoki (Zerker) w/ MLB Sumo + Merlin or Nightingale w/ Ox King + Martha w/ Ox King + Anniversary Blonde (the Ox Kings are unnecessary depending on setup; Martha's defense down can be applied as necessary)
Kintoki Output Calculations
TouhouSniper98's YT Guide
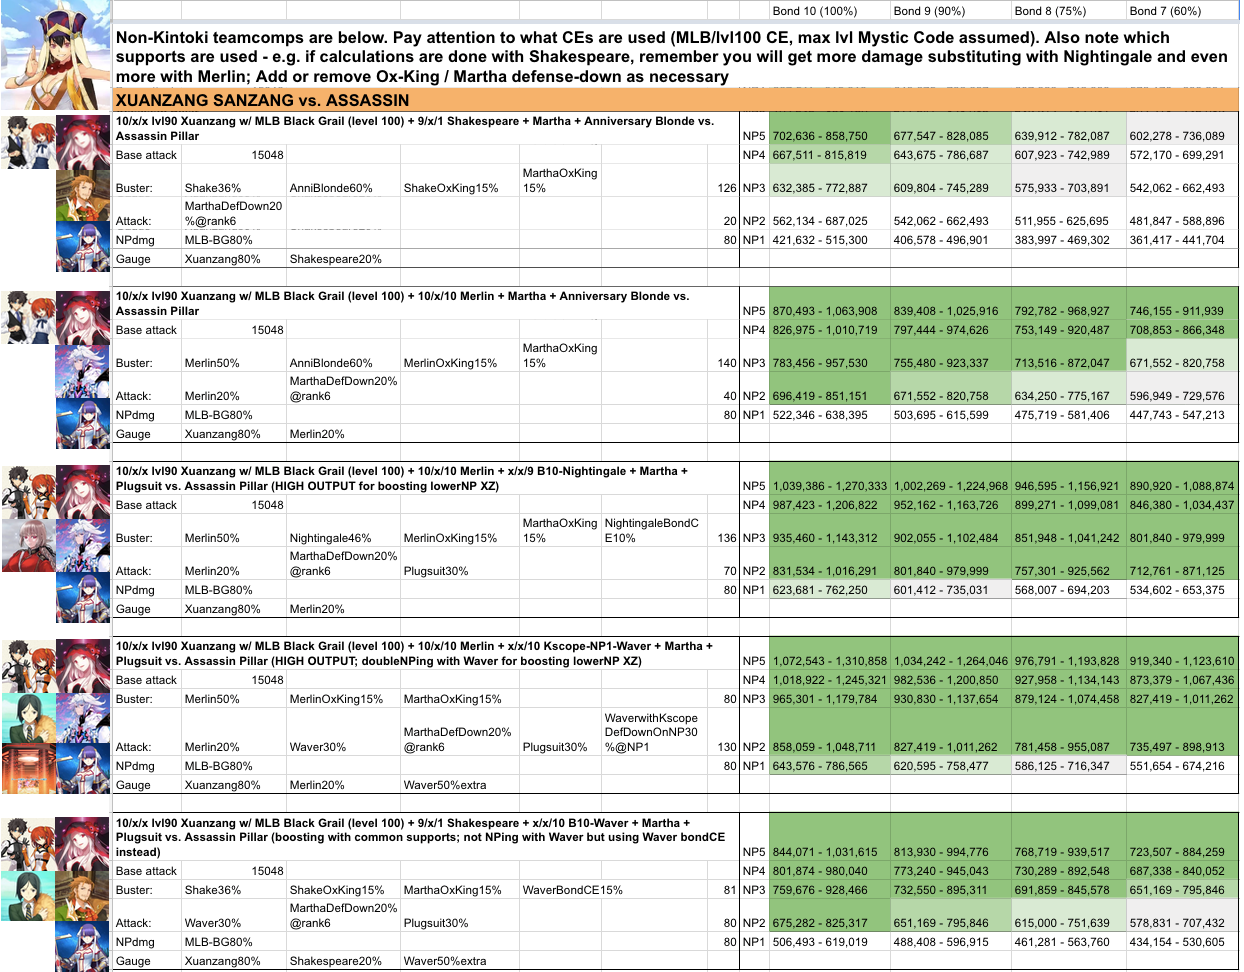
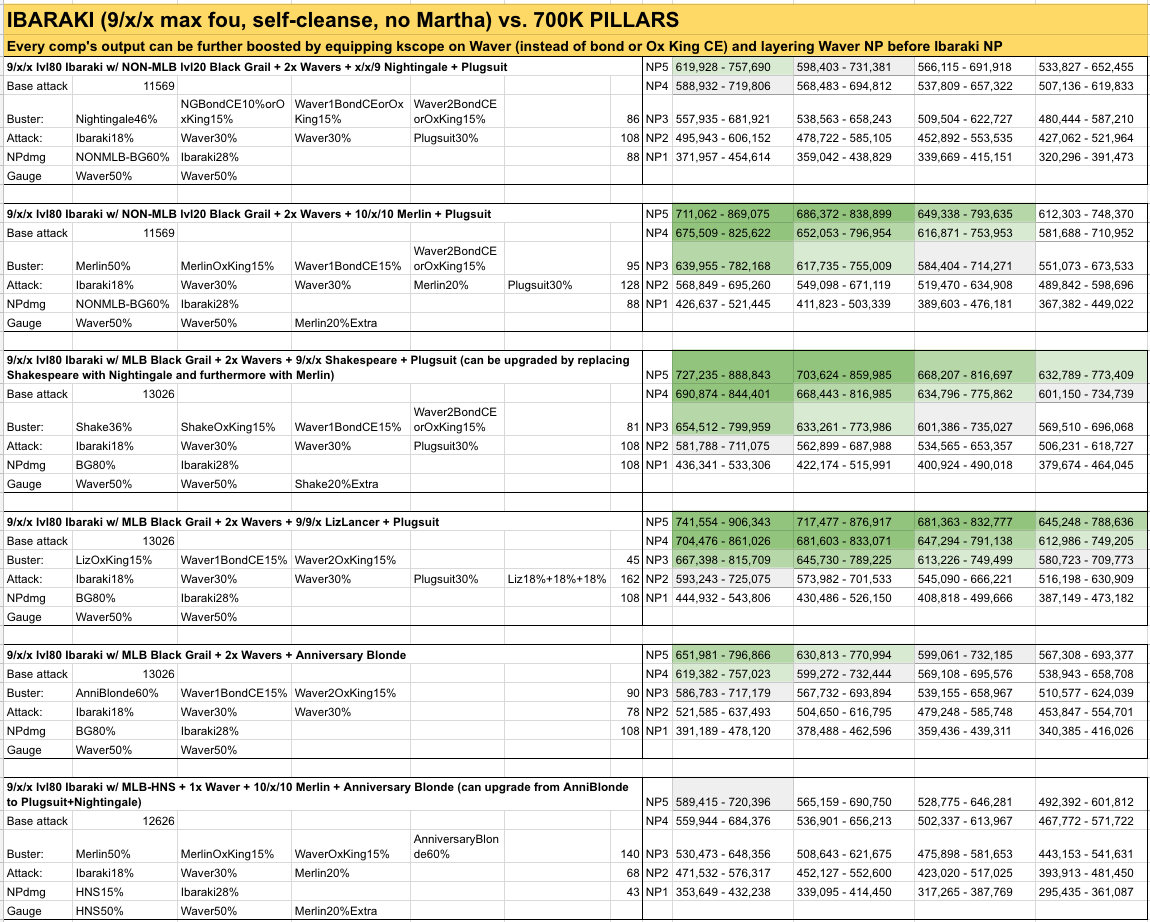
OG Martha (Rider) is required in order to clear debuffs off your team (skill 2). Her enemy defense down is also extra damage for your team (skill 3). Sanson and OG Medea also have single target debuff cleanses for your main nuker but they will not able to boost your damage. Note that Ibaraki is amazing in that she has a self-cleanse (Skill 2). This allows Ibaraki comps to potentially use up to three (3!!) supports (with plugsuit) since Martha is not needed. If you are not depending on Martha's defense down or her Ox King and are using Plugsuit, put Martha in the backline. This way, if your team does not receive the debuff, you do not need to swap in to cleanse.
TouhouSniper98's video guide provides a good rundown of what you need to know
If you aren't using Ibaraki as your main nuker: Even though the debuff only hits your front line, simple logic means plugsuit + backlining your DPS is of no real benefit. You can only fit *two* traditional supports (e.g. Merlin, Waver, Tamamo, Nightingale, Shakespeare, Mozart, etc.) if you use plugsuit.
DPS, Martha, SupportA | SupportB
DPS, SupportA, Support B | Martha
SupportA, SupportB, ServantC | DPS <- Note here how ServantC cannot buff your DPS in one turn
You can use *one* traditional support if you use another mystic code such as Anniversary Blonde.
DPS, Martha, SupportA
The event bond-level-related bonus damage is a PowerMod bonus that stacks additively with NPDamageUp. Therefore, ATKup, BUSTERup, etc., which are modifiers of a different category and would stack multiplicatively, are more valuable than NPDamageUp. This is why Golden Sumo (15%ATKup) is preferred over Holy Night Supper (15% NPDmgUp) in a lot of teamcomps. Also note that ATKup might be a higher priority than what people have been used to since 2xWaverPlugsuit will mostly be sidelined in favor of stacking BUSTERup with Merlin, Ox King, Anniversary Blonde, Nightingale, etc.
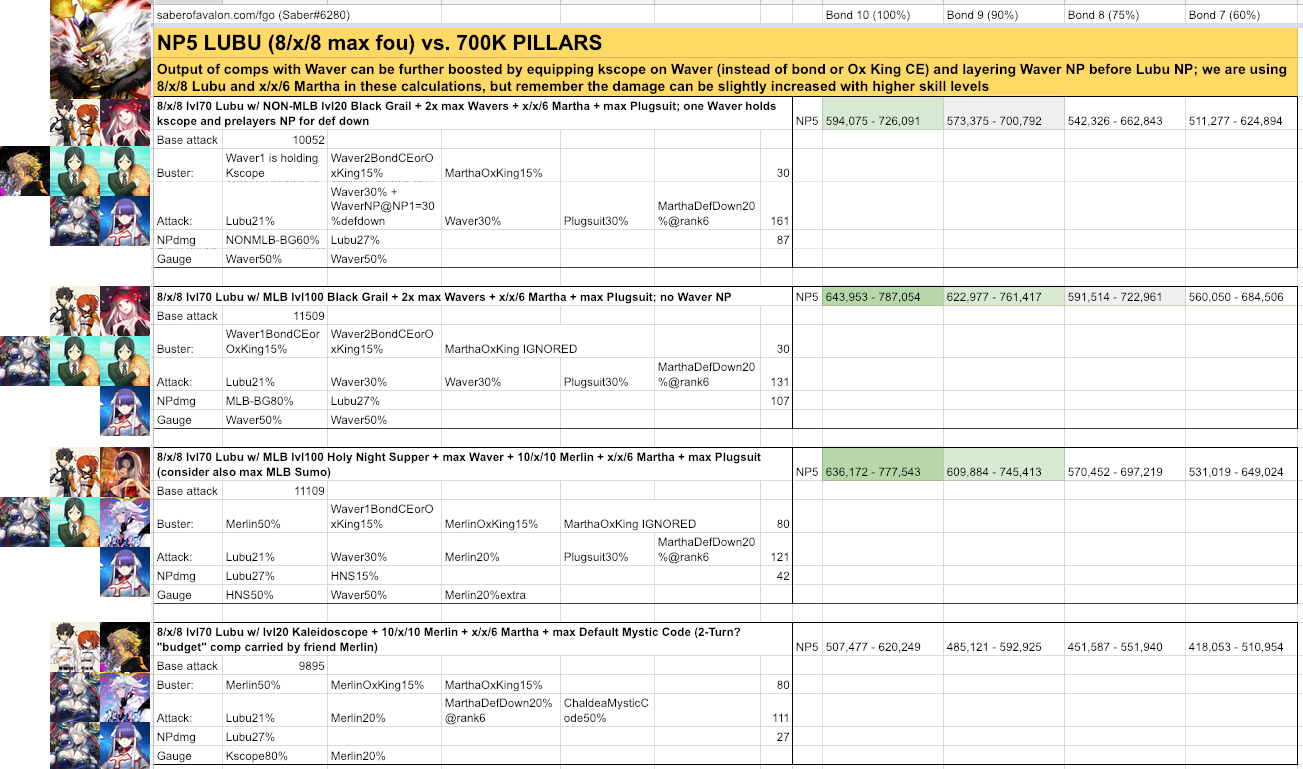
One trick to boosting your 1T damage output is to precede your nuker's NP with Waver's NP. Remember that Waver's NP is 30%DefDown@NP1, 40%DefDown@NP2, 45%DefDown@NP3, etc. which is equivalent to 30%AtkUp, 40%AtkUp, 45AtkUp, etc. When this extra boost is needed, place your Kaleidoscope on Waver. These multipliers are higher than what Waver's Bond 10 CE or Ox King CE would provide (15% buster up). Of course you will need to sit through Waver's NP animation, but it is worth it to guarantee the 1-Turn when you need the extra boost. (You can see an example of this at play in the YouTube video where we were successful in 3-Turning the Christmas Blizzard lotto node with NP1 Mordred.)
After finishing the Christmas 1 lotto on NA earlier today, I started making this infographic for our community. Thanks to the always awesome Hong, I'm sure many of you have already seen the videos of different 3T comps for the Christmas 2 lotto event's hardest difficulty node (which opens near the end of the event), but I thought it would be nice if we had a better grasp on the different comps so I decided to screenshot the different comps and then calculate how much damage each of them do on the 3rd wave based on different NP levels. Maybe this will help some of you! A reminder of course that you can mix and match since so many different servants can solo the dragon on wave 2! (Infographic v0.7 ; updated Nov 25, 2018) This infographic is quite plain and all of the credit goes to the video creators since I simply took screenshots of the videos and then did damage calculations. Thanks to hong and trubo for teaching me FGO-math. Thanks to all of the whales on my friends list who help me powerfarm events and thanks to the many friends in the Xzero community. ;)
As for the 2nd hardest difficulty node for socks farming (the one with Gilgamesh), just use LAntoria (needs higher NP level though NP2 can be enough with the proper levels) or use Karna (NP1 is usually enough with the right setup since Karna has anti-divine!) Check out the video link at the bottom of this post for the Karna NP1 example. (tldr: 1x waver + anniversary blonde)
Karna vs. Gil
Nine Comps
2x Waver Summer Scath
1x Waver Summer Scath
Shakespeare + Morded
JAlter + Mordred
2x Waver + OGScath + Fran
3 Turn Setups for Christmas 2 Lotto's Snowflakes Heroic King (Gilgamesh, Day 5)
6 HNS slots, 1 self-owned MLB HNS required (support DPS, either Drake or Lantoria also requires MLB HNS). Also consider Xzero's Ishtar+Drake+Lantoria No-Plugsuit-No-Waver 3T (2 self-owned MLB HNS required). Lantoria can full clear wave 3 with NP at NP2 if you save Drake's 1st skill buff for wave 3 and also use Anniversary Blonde's buster up.
NP1 Karna
NP2 Lancer Artoria
Demonstration of Karna NP1
Demonstration of Lancer Artoria NP2 full clearing Wave 3 with NP
3 Turn Setups for Christmas 2 Lotto's Powdery Snow Node
.png)